|
|
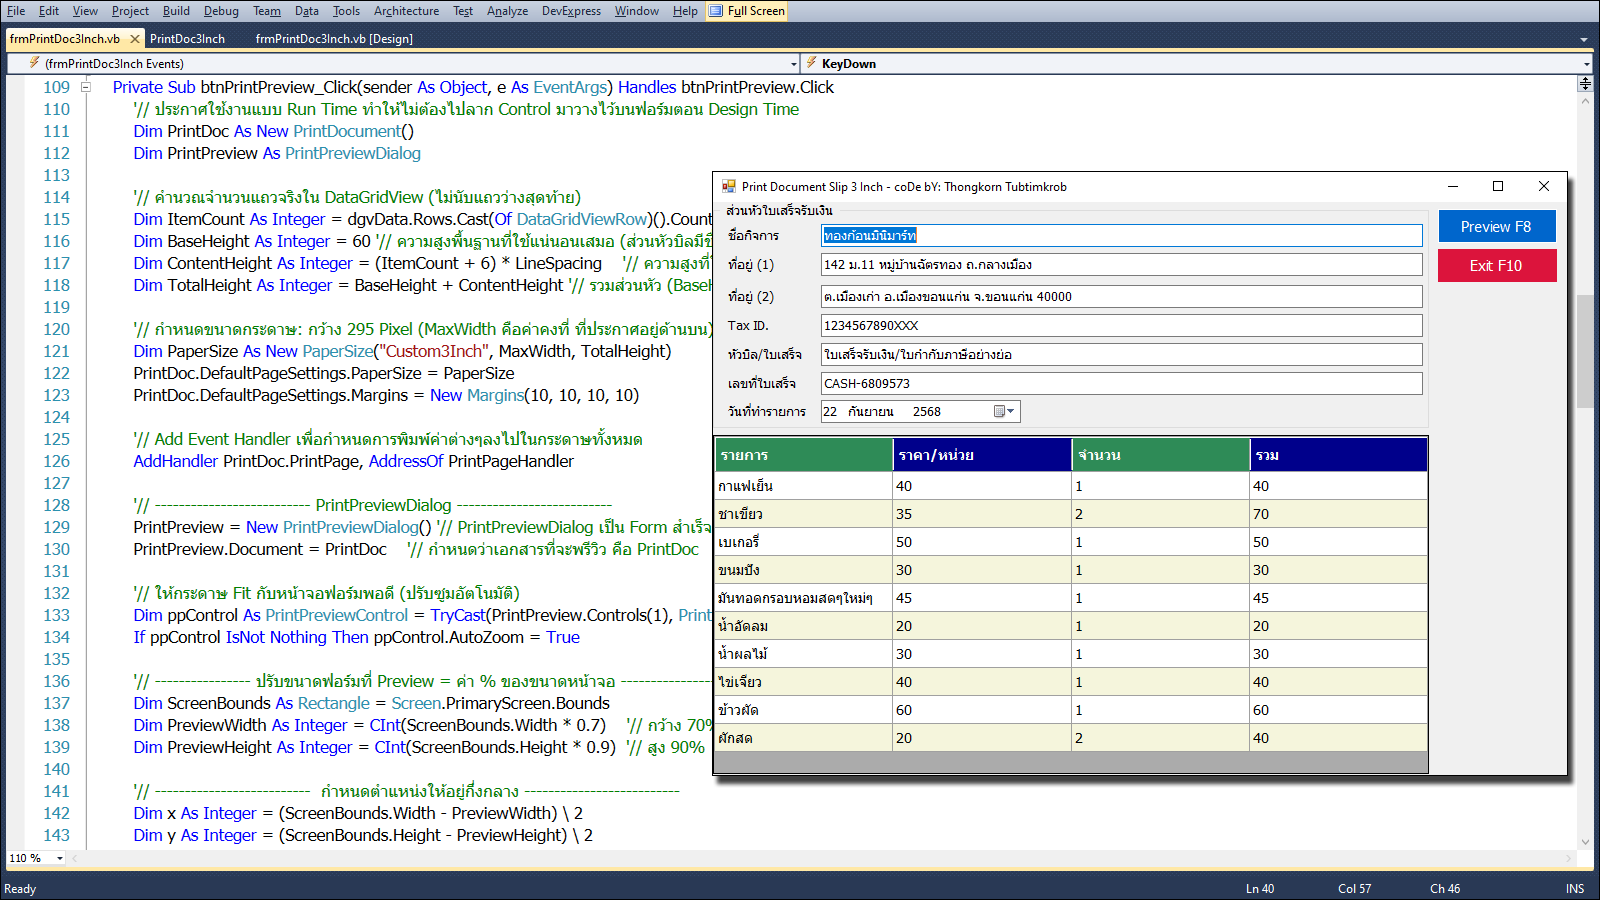
หน้าจอการแสดงผลรายการ ก่อนทำการ Preview ...
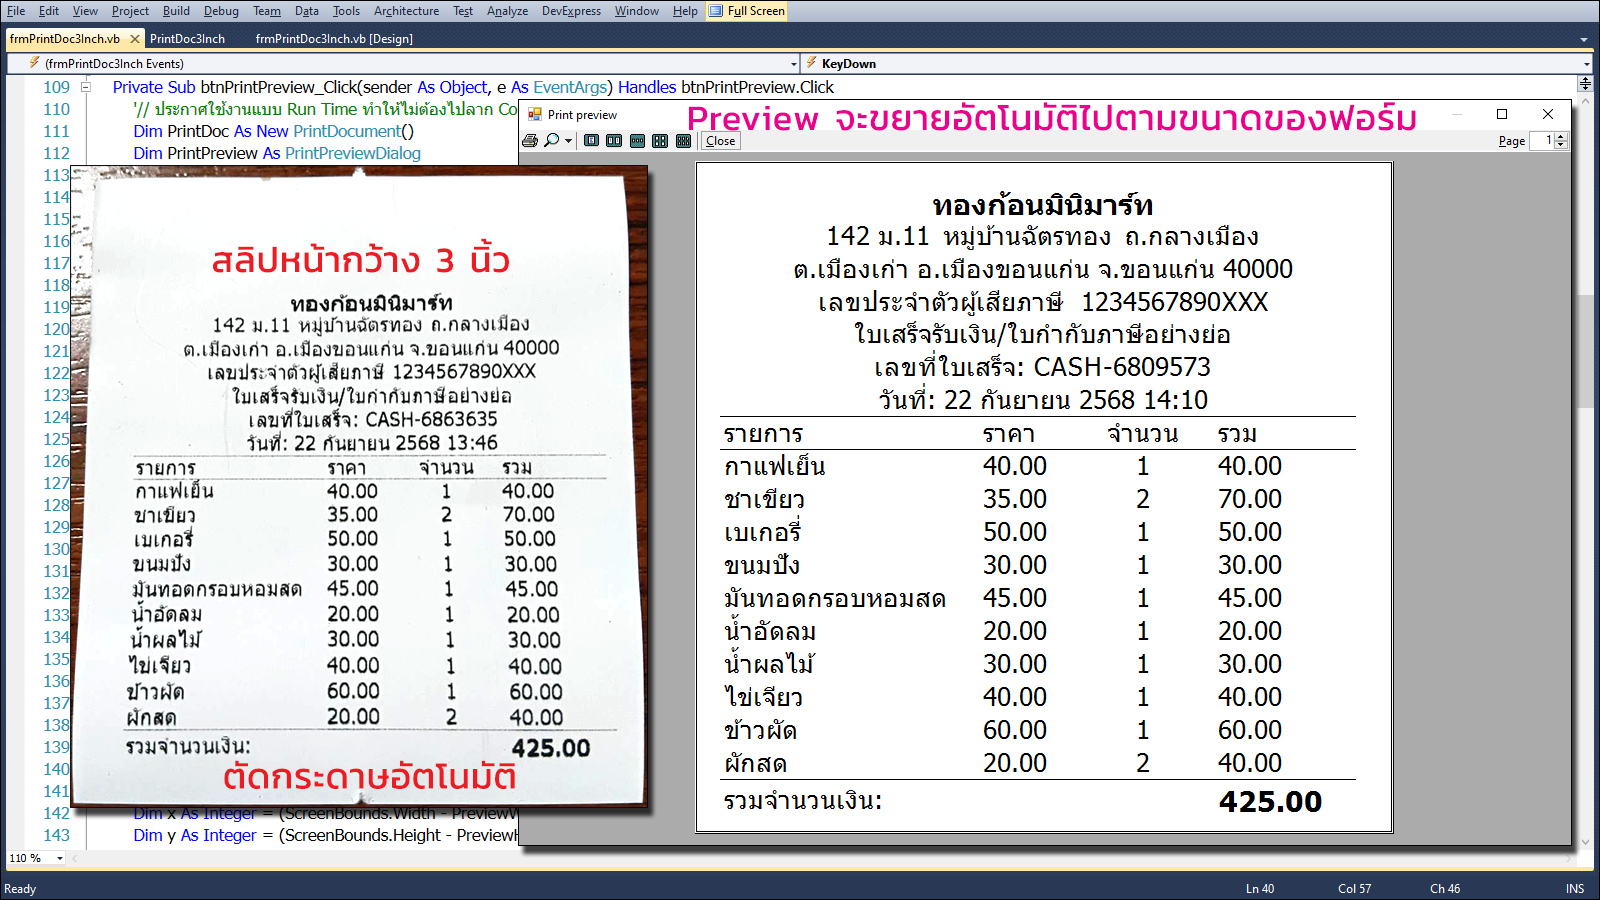
หน้าจอการใช้งาน Print Preview Dialog ...
PrintDocument เป็นคลาสใน .NET Framework (ภายใต้ System.Drawing.Printing) ที่ใช้สำหรับกำหนดเนื้อหาที่จะพิมพ์ลงบนกระดาษ โดยไม่ได้ควบคุมเครื่องพิมพ์โดยตรง แต่ส่งคำสั่งผ่านระบบ Windows Printer Spooler
หลักการทำงาน:
- สร้างออบเจ็กต์ PrintDocument
- กำหนด Event Handler สำหรับเหตุการณ์ PrintPage (ชื่อเหตุการณ์ PrintPageHandler)
- ใน PrintPageHandler ใช้ e.Graphics กับทุกสิ่งที่เราวาด เช่น ข้อความ (DrawString), เส้น (DrawLine), รูปภาพ (DrawImage) หรือ QR Code ก็จะถูกส่งไปยังเครื่องพิมพ์
- เรียก PrintDocument.Print() เพื่อส่งงานพิมพ์จริง หรือ PrintPreviewDialog เพื่อแสดงตัวอย่างก่อนพิมพ์
เพิ่มเติม: แอดมินเพิ่มเติมการแสดงผลใน Print Preview Dialog เพื่อให้ทำการขยายหน้าจอการแสดงผลของกระดาษให้เป็นแบบอัตโนมัติ ตามขนาดหน้าจอของฟอร์ม
ข้อมูลเพิ่มเติมเกี่ยวกับเครื่องพิมพ์สลิป
การตัดกระดาษจะขึ้นอยู่กับการตั้งค่าใน Properties ที่เครื่องพิมพ์สลิปใน Windows ได้ด้วย หากข้อมูลหมดเครื่องพิมพ์จะตัดกระดาษให้อัตโนมัติเองครับ
สูตรคำนวณหาความกว้างของหน้ากระดาษ: (เราต้องใช้หน่วย Pixel)
ขนาดความกว้างของกระดาษมีหน่วย Pixel = Inch × DPI (DPI มีค่าประมาณ 100 = 1 Inch = 100 Pixel)
ดังนั้นหากต้องการขนาดหน้ากว้าง (Width) = 3 นิ้ว (Inch)
Pixel = 3 x 100 = 300 Pixel
มาดูโค้ดฉบับเต็มกันเถอะ ...
- Public Class frmPrintDoc3Inch
- '// สูตรคำนวณ:
- '// ขนาดความกว้างของกระดาษมีหน่วย Pixel = Inch × DPI (DPI มีค่าประมาณ 100 = 1 Inch = 100 Pixel)
- '// MaxWidth = 3 (นิ้ว) x 100 DPI (Dot Per Inch) = 300 Pixel
- '// กำหนดความกว้างของกระดาษ: กว้าง 295 Pixel (ลดค่าลงมาเล็กน้อย)
- Private Const MaxWidth = 295
- '// กำหนดระยะห่างระหว่างบรรทัด (หน่วยเป็นพิกเซลหรือจุดในการวาดบนกระดาษ)
- Private Const LineSpacing = 14
- Private Sub frmPrintDoc3Inch_KeyDown(sender As Object, e As System.Windows.Forms.KeyEventArgs) Handles Me.KeyDown
- Select Case e.KeyCode
- Case Keys.F8
- Call btnPrintPreview_Click(sender, e)
- Case Keys.F10
- Call btnExit_Click(sender, e)
- End Select
- End Sub
- Private Sub PrintDoc3Inch_Load(sender As Object, e As EventArgs) Handles MyBase.Load
- Me.KeyPreview = True '// สามารถกดปุ่มฟังค์ชั่นลงบนฟอร์มได้
- '// กำหนดข้อมูลในส่วนหัวบิล
- txtShopName.Text = "ทองก้อนมินิมาร์ท"
- txtAddress1.Text = "142 ม.11 หมู่บ้านฉัตรทอง ถ.กลางเมือง"
- txtAddress2.Text = "ต.เมืองเก่า อ.เมืองขอนแก่น จ.ขอนแก่น 40000"
- txtTaxID.Text = "1234567890XXX"
- txtHeaderBill.Text = "ใบเสร็จรับเงิน/ใบกำกับภาษีอย่างย่อ"
- txtInvoiceID.Text = "CASH-" & RandomInvoiceID()
- dtpInvoiceDate.Value = Now()
- '// สร้างข้อมูลตัวอย่าง 10 รายการ
- Call LoadSampleData()
- '// ตั้งค่าเริ่มต้นให้กับ DataGridView
- Call SetupDataGridView(dgvData)
- End Sub
- '// ข้อมูลตัวอย่าง
- Private Sub LoadSampleData()
- Dim DT As DataTable = New DataTable()
- With DT.Columns
- .Add("รายการ", GetType(String))
- .Add("ราคา/หน่วย", GetType(Double))
- .Add("จำนวน", GetType(Integer))
- .Add("รวม", GetType(Double))
- End With
- Dim Items As String() = {
- "กาแฟเย็น", "ชาเขียว", "เบเกอรี่", "ขนมปัง", "มันทอดกรอบหอมสดๆใหม่ๆ",
- "น้ำอัดลม", "น้ำผลไม้", "ไข่เจียว", "ข้าวผัด", "ผักสด"
- }
- Dim Prices As Double() = {40, 35, 50, 30, 45, 20, 30, 40, 60, 20}
- Dim Qty As Integer() = {1, 2, 1, 1, 1, 1, 1, 1, 1, 2}
- For i As Integer = 0 To 9
- Dim SubTotal As Double = Prices(i) * Qty(i)
- DT.Rows.Add(Items(i), Prices(i), Qty(i), SubTotal)
- Next
- dgvData.DataSource = DT
- End Sub
- '// สุ่มเลขที่ใบเสร็จให้อยู่ในรูปแบบปี พ.ศ. 2 หลักสุดท้าย + จำนวนตัวเลข 5 หลัก
- Function RandomInvoiceID() As String
- '// ปกติ DateTime.Now.Year ที่ได้มาจาก .NET เป็นปี ค.ศ. (AD) อยู่แล้ว (แต่อยากเอาแบบให้ชัวร์ๆล่ะกัน)
- '// อ่านปีปัจจุบัน (เป็น ค.ศ.)
- Dim YearAD As Integer = DateTime.Now.Year
- '// เช็คปีก่อนให้แน่ใจ
- Dim YearBE As Integer
- If YearAD < 2500 Then
- '// กรณีเป็น ค.ศ. (เช่น 2025) → บวก 543
- YearBE = YearAD + 543
- Else
- '// กรณีเป็น พ.ศ. อยู่แล้ว
- YearBE = YearAD
- End If
- '// เอา 2 หลักท้าย
- Dim YearTwoDigit As String = (YearBE Mod 100).ToString("00")
- '// สุ่มเลข 5 หลัก
- Dim rnd As New Random()
- Dim RandomDigits As String = rnd.Next(0, 100000).ToString("D5")
- '// รวมกัน
- Return YearTwoDigit & RandomDigits
- End Function
- '// ------------------------------------------------------------------------------------------------------------------------------------
- '// ตั้งค่าขนาดกระดาษก่อนทำการ Preview
- '// ------------------------------------------------------------------------------------------------------------------------------------
- Private Sub btnPrintPreview_Click(sender As Object, e As EventArgs) Handles btnPrintPreview.Click
- '// ประกาศใช้งานแบบ Run Time ทำให้ไม่ต้องไปลาก Control มาวางไว้บนฟอร์มตอน Design Time
- Dim PrintDoc As New PrintDocument()
- Dim PrintPreview As PrintPreviewDialog
- '// คำนวณจำนวนแถวจริงใน DataGridView (ไม่นับแถวว่างสุดท้าย)
- Dim ItemCount As Integer = dgvData.Rows.Cast(Of DataGridViewRow)().Count(Function(r) Not r.IsNewRow)
- Dim BaseHeight As Integer = 60 '// ความสูงพื้นฐานที่ใช้แน่นอนเสมอ (ส่วนหัวบิลมีชื่อร้าน วันที่ และอื่นๆ)
- Dim ContentHeight As Integer = (ItemCount + 6) * LineSpacing '// ความสูงที่ใช้เฉพาะ ส่วนเนื้อหา (รายการสินค้า + ส่วนท้าย)
- Dim TotalHeight As Integer = BaseHeight + ContentHeight '// รวมส่วนหัว (BaseHeight) และเนื้อหา (ContentHeight)
- '// กำหนดขนาดกระดาษ: กว้าง 295 Pixel (MaxWidth คือค่าคงที่ ที่ประกาศอยู่ด้านบน), สูงตามคำนวณ
- Dim PaperSize As New PaperSize("Custom3Inch", MaxWidth, TotalHeight)
- PrintDoc.DefaultPageSettings.PaperSize = PaperSize
- PrintDoc.DefaultPageSettings.Margins = New Margins(10, 10, 10, 10)
- '// Add Event Handler เพื่อกำหนดการพิมพ์ค่าต่างๆลงไปในกระดาษทั้งหมด
- AddHandler PrintDoc.PrintPage, AddressOf PrintPageHandler
- '// -------------------------- PrintPreviewDialog --------------------------
- PrintPreview = New PrintPreviewDialog() '// PrintPreviewDialog เป็น Form สำเร็จรูปของ .NET ที่ใช้แสดงตัวอย่างเอกสารที่จะถูกพิมพ์
- PrintPreview.Document = PrintDoc '// กำหนดว่าเอกสารที่จะพรีวิว คือ PrintDoc
- '// ให้กระดาษ Fit กับหน้าจอฟอร์มพอดี (ปรับซูมอัตโนมัติ)
- Dim ppControl As PrintPreviewControl = TryCast(PrintPreview.Controls(1), PrintPreviewControl)
- If ppControl IsNot Nothing Then ppControl.AutoZoom = True
- '// ---------------- ปรับขนาดฟอร์มที่ Preview = ค่า % ของขนาดหน้าจอ ----------------
- Dim ScreenBounds As Rectangle = Screen.PrimaryScreen.Bounds
- Dim PreviewWidth As Integer = CInt(ScreenBounds.Width * 0.7) '// กว้าง 70%
- Dim PreviewHeight As Integer = CInt(ScreenBounds.Height * 0.9) '// สูง 90%
- '// -------------------------- กำหนดตำแหน่งให้อยู่กึ่งกลาง --------------------------
- Dim x As Integer = (ScreenBounds.Width - PreviewWidth) \ 2
- Dim y As Integer = (ScreenBounds.Height - PreviewHeight) \ 2
- PrintPreview.StartPosition = FormStartPosition.Manual
- PrintPreview.Location = New Point(x, y) '// ระบุพิกัดตำแหน่งมุมซ้ายบนของฟอร์มบนหน้าจอ
- PrintPreview.Size = New Size(PreviewWidth, PreviewHeight) '// กำหนดขนาดของ PrintPreviewDialog
- '// กำหนดเครื่องพิมพ์ล่วงหน้า เมื่อเวลาไปกดไอคอนเครื่องพิมพ์ของ Print Preview Dialog
- '// เพราะหากไม่กำหนดเอาไว้ มันจะส่งไปออกเครื่องพิมพ์ที่เป็น Default Printer แทน
- '// *************** อย่าลืมแก้ไข PrinterName ด้วย ***************
- PrintDoc.PrinterSettings.PrinterName = "POS-80"
- If Not PrintDoc.PrinterSettings.IsValid Then
- MessageBox.Show("ไม่พบเครื่องพิมพ์ชื่อ POS-80", "Error", MessageBoxButtons.OK, MessageBoxIcon.Error)
- Exit Sub
- End If
- '// เปิดหน้าจอฟอร์มแสดงผล
- PrintPreview.ShowDialog()
- End Sub
- '// ------------------------------------------------------------------------------------------------------------------------------------
- '// ส่วนของการนำข้อมูลมาพิมพ์
- '// ------------------------------------------------------------------------------------------------------------------------------------
- Private Sub PrintPageHandler(sender As Object, e As PrintPageEventArgs)
- '// กำหนดขนาดของฟอนต์ของแต่ละส่วนที่จะนำมาพิมพ์
- Dim FontHeader As Font = New Font("Tahoma", 9, FontStyle.Bold)
- Dim FontNormal As Font = New Font("Tahoma", 8)
- Dim FontTotal As Font = New Font("Tahoma", 9, FontStyle.Bold)
- Dim Brush As Brush = Brushes.Black
- '// Initialize Position
- Dim StartX As Integer = 10
- Dim StartY As Integer = 10
- '// -------------------------- จัดข้อความให้อยู่กึ่งกลาง --------------------------
- Dim CenterFormat As New StringFormat()
- CenterFormat.Alignment = StringAlignment.Center
- '// MaxWidth คือค่าคงที่ = 295 (ขนาดของกระดาษหน้ากว้าง 3 นิ้ว)
- Dim CenterX As Single = MaxWidth / 2
- '// การพิมพ์ส่วนหัวบิล
- '// สังเกตค่า (LineSpacing * เลขจำนวนเต็ม) ... ตัวเลขจำนวนเต็มที่เพิ่มขึ้นไปทีละ 1 นั่นคือการเลื่อนบรรทัดขึ้นไปเรื่อยๆ
- e.Graphics.DrawString(txtShopName.Text, FontHeader, Brush, CenterX, StartY, CenterFormat)
- e.Graphics.DrawString(txtAddress1.Text, FontNormal, Brush, CenterX, StartY + LineSpacing, CenterFormat)
- e.Graphics.DrawString(txtAddress2.Text, FontNormal, Brush, CenterX, StartY + LineSpacing * 2, CenterFormat)
- e.Graphics.DrawString("เลขประจำตัวผู้เสียภาษี " & txtTaxID.Text, FontNormal, Brush, CenterX, StartY + LineSpacing * 3, CenterFormat)
- e.Graphics.DrawString(txtHeaderBill.Text, FontNormal, Brush, CenterX, StartY + LineSpacing * 4, CenterFormat)
- e.Graphics.DrawString("เลขที่ใบเสร็จ: " & txtInvoiceID.Text, FontNormal, Brush, CenterX, StartY + LineSpacing * 5, CenterFormat)
- '// จัดรูปแบบวันที่:
- Dim InvDateTime As DateTime = dtpInvoiceDate.Value
- Dim ThaiDate As String = InvDateTime.ToString("dd MMMM yyyy HH:mm", New CultureInfo("th-TH"))
- e.Graphics.DrawString("วันที่: " & ThaiDate, FontNormal, Brush, CenterX, StartY + LineSpacing * 6, CenterFormat)
- '// วาดเส้นแบ่ง
- DrawLine(e.Graphics, StartX, StartY + LineSpacing * 7, 280, StartY + LineSpacing * 7)
- '// หัวตาราง
- e.Graphics.DrawString("รายการ", FontNormal, Brush, StartX, StartY + LineSpacing * 7)
- e.Graphics.DrawString("ราคา", FontNormal, Brush, 120, StartY + LineSpacing * 7)
- e.Graphics.DrawString("จำนวน", FontNormal, Brush, 190, StartY + LineSpacing * 7, CenterFormat) '// การจัดข้อความกึ่งกลาง
- e.Graphics.DrawString("รวม", FontNormal, Brush, 220, StartY + LineSpacing * 7)
- '// วาดเส้นใต้หัวตาราง
- DrawLine(e.Graphics, StartX, StartY + LineSpacing * 8, 280, StartY + LineSpacing * 8)
- '// พิมพ์รายการสินค้า ราคา จำนวน และผลรวมราคา แสดงผลลงไปในแต่ละแถว
- Dim yPosition As Integer = StartY + LineSpacing * 8
- Dim TotalAmount As Double = 0
- For Each row As DataGridViewRow In dgvData.Rows
- If Not row.IsNewRow Then
- Dim ItemName As String = row.Cells(0).Value.ToString()
- Dim price As Double = Convert.ToDouble(row.Cells(1).Value)
- Dim qty As Integer = Convert.ToInt32(row.Cells(2).Value)
- Dim SubTotal As Double = price * qty
- '// หากชื่อสินค้าเกิน 15 ตัวอักษร ให้ตัดคำที่เกินออกไป
- Dim name As String = If(ItemName.Length > 15, ItemName.Substring(0, 15), ItemName)
- '//
- e.Graphics.DrawString(name, FontNormal, Brush, StartX, yPosition)
- e.Graphics.DrawString(price.ToString("N2"), FontNormal, Brush, 120, yPosition)
- e.Graphics.DrawString(qty.ToString("N0"), FontNormal, Brush, 190, yPosition, CenterFormat) '// การจัดข้อความกึ่งกลาง
- e.Graphics.DrawString(SubTotal.ToString("N2"), FontNormal, Brush, 220, yPosition)
- '//
- TotalAmount += SubTotal
- yPosition += LineSpacing
- End If
- Next
- '// วาดเส้นแยก
- DrawLine(e.Graphics, StartX, yPosition, 280, yPosition)
- '// รวมยอด (ชิดกับเส้นเลย)
- e.Graphics.DrawString("รวมจำนวนเงิน: ", FontNormal, Brush, StartX, yPosition + 2)
- e.Graphics.DrawString(TotalAmount.ToString("N2"), FontTotal, Brush, 220, yPosition + 2)
- '// สิ้นสุด
- e.HasMorePages = False
- End Sub
- '/ ------------------------------------------------------------------------------------------------------------------------------------
- '/ วาดเส้นแยก
- Private Sub DrawLine(g As Graphics, x1 As Integer, y1 As Integer, x2 As Integer, y2 As Integer)
- Using pen As New Pen(Color.Black, 0.5)
- g.DrawLine(pen, x1, y1, x2, y2)
- End Using
- End Sub
- Private Sub btnExit_Click(sender As System.Object, e As System.EventArgs) Handles btnExit.Click
- Me.Close()
- End Sub
- Private Sub frmPrintDoc3Inch_FormClosed(sender As Object, e As System.Windows.Forms.FormClosedEventArgs) Handles Me.FormClosed
- Me.Dispose()
- GC.SuppressFinalize(Me)
- Application.Exit()
- End Sub
- #Region "SETUP DATAGRIDVIEW"
- Sub SetupDataGridView(DGV As DataGridView)
- '// จัดการรูปแบบและควบคุม DataGridView
- With DGV
- .RowHeadersVisible = False
- .AllowUserToAddRows = False
- .AllowUserToDeleteRows = False
- .AllowUserToResizeRows = False
- .MultiSelect = False
- .SelectionMode = DataGridViewSelectionMode.FullRowSelect
- .ReadOnly = True
- '// Data rows
- .Font = New Font("Tahoma", 10)
- .RowTemplate.MinimumHeight = 27
- .RowTemplate.Height = 27
- '// Autosize Column
- .AutoSizeColumnsMode = DataGridViewAutoSizeColumnsMode.Fill
- '// Header
- With .ColumnHeadersDefaultCellStyle
- .BackColor = Color.RoyalBlue
- .ForeColor = Color.White
- .Font = New Font(.Font, FontStyle.Bold)
- End With
- .ColumnHeadersHeightSizeMode = DataGridViewColumnHeadersHeightSizeMode.DisableResizing
- .ColumnHeadersHeight = 36
- '/ Accept changes to the header's background color.
- .EnableHeadersVisualStyles = False
- '// Even-Odd Color of Rows.
- .AlternatingRowsDefaultCellStyle.BackColor = Color.Beige
- '// Even-Odd Color of Columns.
- For iCol As Integer = 0 To .Columns.Count - 1
- '// If any integer Mod by 2 and gets the answer is 0 so even number, 1 is an odd number.
- If iCol Mod 2 = 1 Then
- .Columns(iCol).HeaderCell.Style.BackColor = Color.DarkBlue
- Else
- .Columns(iCol).HeaderCell.Style.BackColor = Color.SeaGreen
- End If
- Next
- End With
- End Sub
- #End Region
- End Class
ดาวน์โหลดโค้ดต้นฉบับ VB.NET (2010) ได้ที่นี่ ...
|
ขออภัย! โพสต์นี้มีไฟล์แนบหรือรูปภาพที่ไม่ได้รับอนุญาตให้คุณเข้าถึง
คุณจำเป็นต้อง ลงชื่อเข้าใช้ เพื่อดาวน์โหลดหรือดูไฟล์แนบนี้ คุณยังไม่มีบัญชีใช่ไหม? ลงทะเบียน
x
|


 โพสต์ 2025-9-22 15:07:15

