|
|
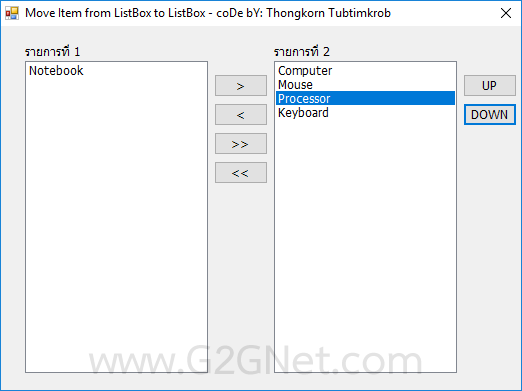
ในการเคลื่อนย้ายไอเทม หรือรายการที่มีอยู่ใน ListBox Control หนึ่ง ไปยังอีกตัวหนึ่ง หลักการก็ไม่ได้ยากเย็นอะไรเลย สิ่งแรกคือเราต้องรู้จักคุณสมบัติ (Properties) ของตัว ListBox (หรือ Control ตัวอื่น) และกลวิธี (Method) ในการเพิ่ม (Add) หรือลบ (Remove) ในแต่ละไอเทม (Item) ...
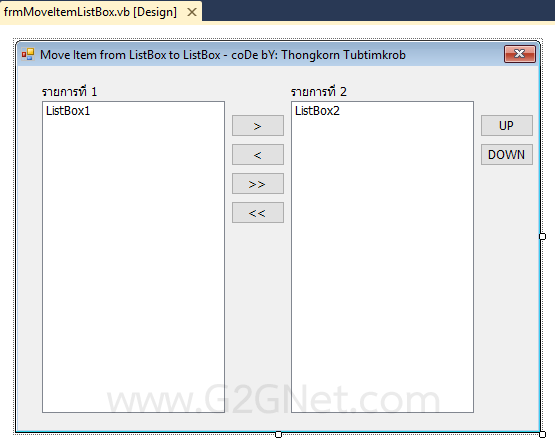
หน้าจอ Design Time ...
มาดูโค้ดกันเถอะ ... คำอธิบายจะอยู่ในโค้ด หวังว่าคงเข้าใจได้ไม่ยาก
- ' / --------------------------------------------------------------------
- ' / Developer : Mr.Surapon Yodsanga (Thongkorn Tubtimkrob)
- ' / eMail : thongkorn@hotmail.com
- ' / URL: http://www.g2gnet.com (Khon Kaen - Thailand)
- ' / Facebook: https://www.facebook.com/g2gnet (For Thailand)
- ' / Facebook: https://www.facebook.com/commonindy (Worldwide)
- ' / Purpose: Transfer Items Between 2 ListBoxes.
- ' / Microsoft Visual Basic .NET (2010)
- ' /
- ' / This is open source code under @CopyLeft by Thongkorn Tubtimkrob.
- ' / You can modify and/or distribute without to inform the developer.
- ' / --------------------------------------------------------------------
- Public Class frmMoveItemListBox
- Private Sub frmMoveItemListBox_Load(sender As System.Object, e As System.EventArgs) Handles MyBase.Load
- '// ใส่ค่าไอเทมตัวอย่าง
- With ListBox1
- .Items.Add("Computer")
- .Items.Add("Processor")
- .Items.Add("Notebook")
- .Items.Add("Mouse")
- .Items.Add("Keyboard")
- End With
- '// เพิ่มคำอธิบายบนปุ่มคำสั่งแต่ละตัว
- Dim MyToolTip As New ToolTip
- MyToolTip.SetToolTip(Me.Button1, "ย้ายไอเทมที่เลือกไปทางขวา")
- MyToolTip.SetToolTip(Me.Button2, "ย้ายไอเทมที่เลือกไปทางซ้าย")
- MyToolTip.SetToolTip(Me.Button3, "ย้ายไอเทมทั้งหมดไปทางขวา")
- MyToolTip.SetToolTip(Me.Button4, "ย้ายไอเทมทั้งหมดไปทางซ้าย")
- MyToolTip.SetToolTip(Me.Button5, "ย้ายไอเทมที่เลือกขึ้นไปด้านบน")
- MyToolTip.SetToolTip(Me.Button6, "ย้ายไอเทมที่เลือกลงไปด้านล่าง")
- End Sub
- Private Sub Button1_Click(sender As System.Object, e As System.EventArgs) Handles Button1.Click
- '// ยังไม่ได้เลือกไอเทม
- If ListBox1.SelectedIndex < 0 Then
- MessageBox.Show("กรุณาเลือกไอเทมในรายการที่ 1 ก่อน.", "รายงานสถานะ", MessageBoxButtons.OK, MessageBoxIcon.Information)
- Else
- '// เพิ่มไอเทมที่เลือกจาก ListBox1 ไปให้กับ ListBox2
- ListBox2.Items.Add(ListBox1.SelectedItem)
- '// ลบไอเทมที่เลือกใน ListBox1 ออกไป
- ListBox1.Items.Remove(ListBox1.SelectedItem)
- End If
- End Sub
- Private Sub Button2_Click(sender As System.Object, e As System.EventArgs) Handles Button2.Click
- If ListBox2.SelectedIndex < 0 Then
- MessageBox.Show("กรุณาเลือกไอเทมในรายการที่ 2 ก่อน.", "รายงานสถานะ", MessageBoxButtons.OK, MessageBoxIcon.Information)
- Else
- '// เพิ่มไอเทมที่เลือกจาก ListBox2 ไปให้กับ ListBox1
- ListBox1.Items.Add(ListBox2.SelectedItem)
- '// ลบไอเทมที่เลือกใน ListBox2 ออกไป
- ListBox2.Items.Remove(ListBox2.SelectedItem)
- End If
- End Sub
- Private Sub Button3_Click(sender As System.Object, e As System.EventArgs) Handles Button3.Click
- '// ลูปเอาไอเทมทั้งหมดที่มีอยู่ใน ListBox1 ไปให้กับ ListBox2
- For Each item In ListBox1.Items
- ListBox2.Items.Add(item)
- Next
- '// ลบไอเทมที่มีอยู่ทั้งหมดใน ListBox1 ออกไป
- ListBox1.Items.Clear()
- End Sub
- Private Sub Button4_Click(sender As System.Object, e As System.EventArgs) Handles Button4.Click
- '// ลูปเอาไอเทมทั้งหมดที่มีอยู่ใน ListBox2 ไปให้กับ ListBox1
- For Each item In ListBox2.Items
- ListBox1.Items.Add(item)
- Next
- '// ลบไอเทมที่มีอยู่ทั้งหมดใน ListBox2 ออกไป
- ListBox2.Items.Clear()
- End Sub
- Private Sub Button5_Click(sender As System.Object, e As System.EventArgs) Handles Button5.Click
- '// การเลื่อนไอเทมขึ้น
- If ListBox2.SelectedIndex > 0 Then
- '// หากแถวที่ต้องการเลื่อนขึ้นไปข้างบน เช่น จากแถว 5 ต้องเลื่อนขึ้นไปอยู่ที่แถว 4 เลยต้องลบ 1
- Dim iRow = ListBox2.SelectedIndex - 1
- '// แทรกไอเทมในแถวที่เลื่อนขึ้นไป
- ListBox2.Items.Insert(iRow, ListBox2.SelectedItem)
- '// ลบแถวตัวมันเองออกไป
- ListBox2.Items.RemoveAt(ListBox2.SelectedIndex)
- '// เลือกแถวปัจจุบันที่ถูกเลื่อนขึ้น
- ListBox2.SelectedIndex = iRow
- End If
- End Sub
- Private Sub Button6_Click(sender As System.Object, e As System.EventArgs) Handles Button6.Click
- '// Trap Error: หากไม่มีการเลือกไอเทม ก็ให้เด้งหนีออกไป
- If ListBox2.SelectedItem = Nothing Then Exit Sub
- '// ไอเทมที่เลือกต้องน้อยกว่า จำนวนไอเทมทั้งหมดลบ 1 (Index เรานับที่ 0)
- If ListBox2.SelectedIndex < ListBox2.Items.Count - 1 Then
- '// หาแถวที่ต้องเลื่อนลงไปข้างล่าง 2 ตำแหน่ง
- Dim iRow = ListBox2.SelectedIndex + 2
- '// ไปแทรกแถวไอเทมใหม่
- ListBox2.Items.Insert(iRow, ListBox2.SelectedItem)
- '// ลบตัวมันเองออก
- ListBox2.Items.RemoveAt(ListBox2.SelectedIndex)
- '// ลบออก 1 เพื่อเลือกแถวที่เลื่อนลงไป
- ListBox2.SelectedIndex = iRow - 1
- End If
- End Sub
- End Class
ดาวน์โหลดโค้ดต้นฉบับ VB.NET (2010) ได้ที่นี่ ...
|
ขออภัย! โพสต์นี้มีไฟล์แนบหรือรูปภาพที่ไม่ได้รับอนุญาตให้คุณเข้าถึง
คุณจำเป็นต้อง ลงชื่อเข้าใช้ เพื่อดาวน์โหลดหรือดูไฟล์แนบนี้ คุณยังไม่มีบัญชีใช่ไหม? ลงทะเบียน
x
|


 โพสต์ 2018-3-31 14:52:46


 โพสต์ 2022-10-25 19:25:42